Theatre Make-Up Tutorial: Part 2 of 3
A Dancer's Life – Make Up for the Stage
Now that you have everything that you need in your basic stage make-up kit, now is the time to have a go at applying it. Now remember, make-up is a skill and it will take time to master, so don't worry if your first applications looks more Grizabella than Giselle. You can rest assured that over time, you WILL become the Swan Queen.
PART 2 - Applying Your Make-Up
First of all, ensure you have your make-up laid out and ready to go. Be sure to remove any previous make up that you may have been wearing throughout the day with make-up cleansing wipes and, wash your skin well with warm soapy water. Pat dry your skin to remove excess water, and you are ready to go.
1 - Serum
So, let's start by applying your Serum. The active ingredients in your serum penetrate better when skin is clean, warmed and slightly moist, but that won't be a problem as you have already followed the steps above. Apply a warm moist towel to your face to gently open pores and leave skin slightly moist. Place small dots of serum about the radius of a small pea all over your face and then blend lightly and quickly all over. You can blend your serum using your hands but be sure that you cover your whole face.
2 - Primer
Many people skip applying primer, as they think it is unnecessary. However, taking just a few minutes to add it to your make-up routine will make a massive difference to your end result. Primer smoothes the surface of your skin, helping to reduce fine lines and pores. It evens out your skin tone, and helps your make-up stay on for longer without smudging.
Apply your primer to the middle of your face and blend it outwards in gentle circular motions. Again, this stage can be done using your hands. The motion that you use to apply your primer should be similar to that you would use to apply moisturiser. Ensure that your primer is worked right to the edge of your face, and blend into your hairline and neck. Take care to make sure that it is distributed evenly across the face so your get a smooth, even coverage.
3 - Foundation
It isn't too important whether you decide to use a liquid, cream or powder foundation. However, it should be applied to the centre of your face first. Place a few dabs of foundation to both of your cheeks near your nose, your chin, and a bit on your forehead. Blend all these together moving outwards with your tools of choice. It may take you some time to work out which tool is best for yous and the make-up you have chosen, but normally you would either use a foundation brush or sponge. Make sure you have blended the foundation so the end result gives an even coverage that doesn't have any noticeable lines or gaps.
REMEMBER: You should be able to tell where your foundation starts and ends, this will require a bit of practice, but there is nothing worse than foundation that stops in a hard line around your jaw where your face and neck are two different colours.
Make sure that you don't apply your foundation too thick, start sparingly and add if necessary, otherwise your face will end up looking fake rather than natural and beautiful.
4 - Discolouration & Blemish Concealer
For this step you will need to use a fine point concealer brush to ensure you application is accurate. The purpose of this step is to hide any blemishes, and if you go too far or use too much then you will highlight them...No one wants that.
Apply the concealer exactly on and around the area needing help with your concealer brush, then blend. For more accuracy around the edges you can blend by lightly tapping with your finger.
5 - Concealer
Firstly apply several dots of concealer under the eyes close to the lashes, and a dot to the inside corners of the eyes. Using your brush, tap (never rub) in the concealer. As with every stage, take great care to make sure you blend well. For extra precision you can also use your index finger.
After that, apply concealer on any other uneven spots on the face, this could include the chin, and around the nose and mouth. As before, tap to blend, never rub.
This stage can be repeated as many times as you require to get a good coverage to your face. At this point it is useful to dust a very light layer of powder to your face to help set the base foundation of your face, but don't go overboard, as you will be adding more powder later and you don't want your face to end up looking powdery and dry.
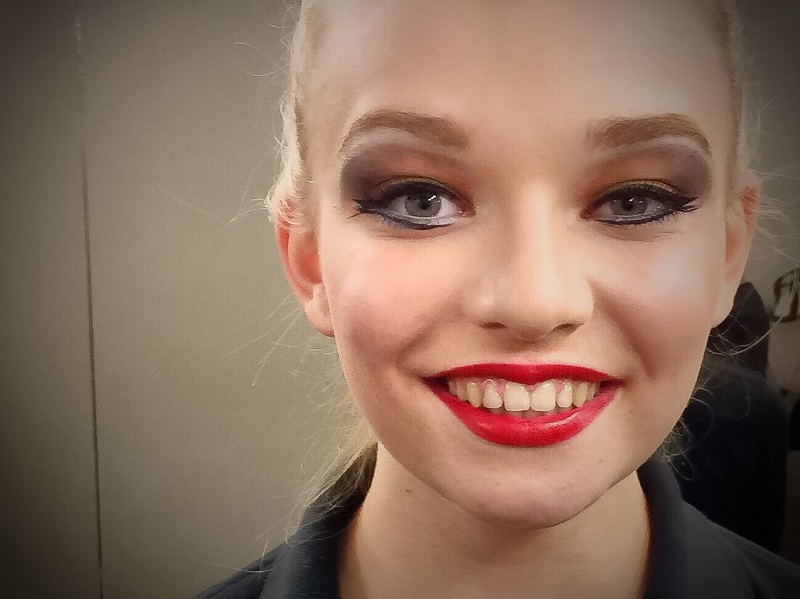
6 - Eye Shadow
When it comes to eyeshadow, there are multiple styles, designs and colour palettes you can choose from. Styles include the fan shape, snow globe, smoky, cat, cut crease and many others. For the purposes of this blog post we are going to discuss the smoky eye as it is the most common, then we will come back to other varieties at a later date.
First, you need to choose your colours. For this effect, it is best to have three shades of a similar colour: a light, creamy colour, a medium base colour and a dark smoky colour. It is recommended that you use loose powder eyeshadows as these are easier to blend and create a better overall finish. You will also need to be sure you have good quality brushes. If you use old and battered brushes then you will end up with a streaky and inaccurate effect.
Using the lightest of your three eyeshadow shades and your eyeshadow brush, dab it on the inside corner of your eyelid on both your upper and lower lids. Sweep it directly under your eyebrows as well, from the beginning to the end of your brows.
Now, using your middle eyeshadow shade, sweep it over your entire eyelid. Be sure to blend it at the inside corners with your highlighter, otherwise you will end up with a harsh divide between the two colours which you don't want. Apply it as far up the eyelid to the natural crease in your lid, and do not go all the way to the highlighter underneath your brows.
Using your darkest shade, begin at the outside corner of your eyes and sweep in a small "C" shape from halfway inwards on the eyelash line, out and around to about halfway inwards on the crease of your eyelid. The darkest part should always be the point at the upper edge of your lash line working inwards or upwards. Don’t apply the shadow too far in. You want the inside one-third to half of your eyelid to not have any dark shadow.
Now use a clean brush to blend the colours together. Start by blending the lightest colours. Again, move in a "C" shape and blend so that there is a nice, smooth progression through the three colours. Gently blend the dark crease shadow outwards towards your brow bone. It should fade softly into your skin, and should not significantly overlap your highlighter that has been placed under your eyebrows.
7 - Contour Palette
Contouring is about creating and highlighting the structure of your skin. With your contour palette, take the colour that's a few shades lighter than your normal skin tone. Use a clean foundation brush to apply a half an inch to one inch stroke of foundation to the places on your face where the sun would naturally hit. These are:
- In the centre of your forehead
- Along the top of your brow lines
- Along the bridge of your nose
- On the apples of your cheeks
- On your cupid's bow
- In the centre of your chin
Then take a darker shade and apply to the areas that would be naturally shaded from the sun. These are:
- Directly below your hairline, at the top of your forehead
- On the right and left sides of your forehead, near your hairline on either side
- Along the right and left sides of your nose
- In the hollows of your cheeks
- Along your jawline on both sides, from your ears to the tip of your chin
Now blend these together to create a smooth, structured use to the face. As before, take time to ensure that your contour is blended to create a natural and smooth finish. Add blusher to your cheeks at this point and blend to add warmth to the overall face.
8 - Contour Palette
Use a clean powder brush to dust a fine layer of finishing powder all over your face.
9 - White Liquid Eye Liner
Apply the white liquid liner under the eye, and moving out to about one-third of an inch past the outer edge of the eye. This helps to ensure that your eyes look larger and more open from the audience. Ensure you create a consistent and straight line. This is another aspect which will take a little patience and practice to get right.
10 - Black Liquid Eye Liner
Apply liquid eyeliner to the top of the eye, as close to the lashes as you can manage. Also apply a very thin line of eyeliner to the bottom of the eye on the outside of the white eyeliner. Be careful not to apply too much. If the line is too thick on the bottom of the eye, it actually makes the eyes look less open on stage.
Both the top and bottom eyeliner should move out, on top and underneath, the white eyeliner to the same finishing point about one third of an inch outside the edge of the eye.
11 - Eyebrow Pencil
Start by using an eyebrow pencil a few shades darker than your hair colour. Make sure your eyebrow pencil is nice and sharp, you are trying to create an overall effect by drawing lots of small lines, like a painting, rather than filling your eyebrows in one block colour. Work from the inside of the brow from above the outer side of the nose and fill the eyebrow with lots of little lines following the current shape of the eyebrow. It would be helpful to shape your eyebrows to how you want them to look before starting your make up (but that is something for another day).
Once your eyebrows look nice and full, use your brow brush to gently blend the colour together. Once you are happy with the look, you can use a small amount of gel on the brow brush to set the eyebrows in place.
12 - Mascara
Using the mascara of your choice, gently coat the eye lashes in a soft, upward sweeping motion that is coupled with a gentle back and forth movement, so you ensure all the lash is coated. It is up to you whether you start with your bottom or top lash. Be sure to use mascara sparingly and build gently to create the overall look.
13 - Lips
First you'll want to apply your lip liner. Choose a colour that matches your lips, not your lipstick. Begin by dotting it at various points along the outline of your lips. Then, drawing very lightly, use the liner to connect the dots. To apply your lipstick, start at the centre of the upper lip and moving outward toward one corner. Bring the lipstick back to the centre and run it outward toward the other corner. Repeat with the lower lip. To fill in any missing colour, dab the lipstick with your little finger, then dot the colour onto your lips with the finger.
To finish, you need to blot your lips. This will make the lipstick last longer and keep it off your teeth. Take a facial tissue and fold it in half and hold it in two hands with the fold facing you. Place it between your lips and press your lips together gently, then release. To make lipstick last even longer, dust a little powder on the tissue before blotting.
Now you have the information to practice applying your make up, give it a try and see how you get on. If you want to share your results with us, then post to Instagram and tag Starbrite Studios using the hashtag #starbritemakeup.
We will soon follow up this blog with a YouTube tutorial, so you can improve your skills even further. Next week our blog will give you tips and tricks for applying your make up that we haven't managed to cover in this post.
If you would like a reminder of the essential items you need in your make-up bag, then please refer to part one in our make-up tutorial series.
And if you are interested in some useful hints and tips about how to apply you make-up, then why not head over to part three?